Gardening Tips
How to Grow Cassava from Cuttings: Easy Way to Start Your Own Tapioca Plant
May
Cassava is a fascinating woody shrub that thrives in warm tropical and subtropical climates, perfect for gardeners looking to add a bit of exotic flair to their green space. While its large, lush green leaves bring a nice touch of ornamental charm to your garden, cassava is mostly grown for its deliciously starchy tuberous roots and nutrient-rich leaves. These roots are a staple food in places like South Africa and Southeast Asia, prized for their hearty carbohydrate punch.
Cassava also known as yuca or tapioca plant. This hardy, calorie-dense crop grows not from seeds, but simply grows Cassava from cuttings, and with a little know-how, you can cultivate it right in your backyard—even in the U.S., if you’re in zones 8 to 11.
If you’re after a purely decorative plant, keep an eye out for the variegated cassava variety. It features stunning palmate leaves with creamy-yellow centers and striking bright red stems—definitely a showstopper!
But a quick heads-up before you dive in: cassava roots are toxic when raw, so keep curious hands and pets away until they’re properly cooked.
Ready to get your hands dirty? In this guide, you’ll learn exactly how to grow cassava from cuttings—step by step—so you can enjoy this versatile plant in your own backyard.
Why Cassava Deserves a Spot in Your Garden

Most Americans know cassava in the form of tapioca pearls in pudding—or maybe as cassava fries or flour in gluten-free recipes. But in much of the world, especially in Africa, Asia, and Latin America, cassava is a survival crop. And it’s easy to see why:
-
Heat- and drought-resistant once established
-
Produces high-yield roots that store calories for months
-
Leaves are edible too (with proper cooking)
-
Low maintenance, great for busy gardeners
-
Doesn’t require constant watering or daily care
It also fits beautifully into sustainable and regenerative gardening systems, making it popular in food forests and permaculture zones.
Step 1: Choosing the Right Cassava Cuttings
Cassava doesn’t grow from seeds—it grows from stem cuttings.
Think of it like planting a potato. You cut a section of the stem, stick it into the ground, and it grows roots and shoots.
But not just any stem will do.
Here’s what to look for:
-
Cuttings should come from plants that are 8–14 months old
-
The stems must be mature, woody, and disease-free
-
Look for visible buds or nodes on the stem—this is where new growth comes from
-
Each cutting should be about 8–12 inches long, with 4–6 nodes
You can order cassava stem cuttings online from Best Garden Seed here.
If you’re lucky enough to have a friend or neighbor already growing cassava, you can ask for a few stems after they harvest—just be sure they’re free of disease like cassava mosaic virus.
Step 2: Prepping Your Cuttings for Success
Once you have your cuttings, don’t rush to plant them straight away.
Let them sit in the shade for 2–3 days to allow the cut ends to “heal” or dry out. This prevents rot and encourages healthier root development. This step mimics what farmers do in cassava-growing countries.
Want to boost success rates? Dip the bottom of each cutting in organic rooting hormone powder—available at most garden centers.
Also, if you’re in a borderline zone (like zone 8a), soaking the lower part in warm water for 2–3 hours before planting can help stimulate early growth, especially in cooler soils.
Step 3: Preparing the Perfect Soil and Location

Cassava might be tough, but it thrives when given the right environment.
Best conditions for cassava:
-
Soil: Loose, sandy loam with excellent drainage
-
pH: Slightly acidic to neutral (5.5 to 7.0)
-
Light: Full sun—at least 6 hours per day
-
Temperature: Daytime temps above 77°F (25°C) work best
Avoid clay-heavy or compacted soils—cassava roots will struggle to expand and may rot.
If you don’t have great soil, consider raised beds or containers (at least 18 inches deep) filled with a mix of garden soil, compost, and coarse sand.
Step 4: Planting Cassava Cuttings

Now comes the fun part: getting those cuttings into the ground.
There are two planting methods:
1. Vertical Planting
Insert the stem cutting directly into the soil, upright, with about ⅔ below the surface and a few nodes sticking out.
2. Angled or Horizontal Planting
Lay the cutting at a 45-degree angle or horizontally just below the soil. This method works well in drier zones as it encourages multiple shoot development.
Spacing is important:
-
3 feet between plants
-
4 feet between rows
This spacing ensures the cassava roots have room to grow wide and thick.
Step 5: Daily Care Without Daily Stress
Cassava is a gardener’s dream when it comes to maintenance.
Watering:
-
Water deeply when first planted
-
Once established (after 6–8 weeks), water once weekly during dry spells
-
Overwatering = root rot risk
Feeding:
Cassava is pretty self-sufficient but benefits from a little feeding:
-
Early growth: A light dose of nitrogen (use compost or fish emulsion)
-
Mid-growth: Switch to potassium-rich fertilizer (like wood ash or banana peel compost tea)
Pro tip: Avoid overdoing it with high-nitrogen fertilizers. You want big roots, not just big leaves!
Step 6: Watch Out for Pests and Diseases

Cassava isn’t a magnet for pests in the U.S., but there are still a few to watch for.
Common pests:
-
Whiteflies
-
Aphids
-
Spider mites
Use insecticidal soap or neem oil to manage them early. Don’t wait for them to multiply.
Disease prevention tips:
-
Don’t reuse soil from infected plants
-
Always start with clean, healthy cuttings
-
Practice crop rotation if growing cassava year after year
One disease to be aware of is cassava mosaic virus, which causes leaf mottling and stunted growth. While rare in the U.S., it can appear in imported cuttings. If you suspect it, remove the plant and burn the stem (don’t compost it).
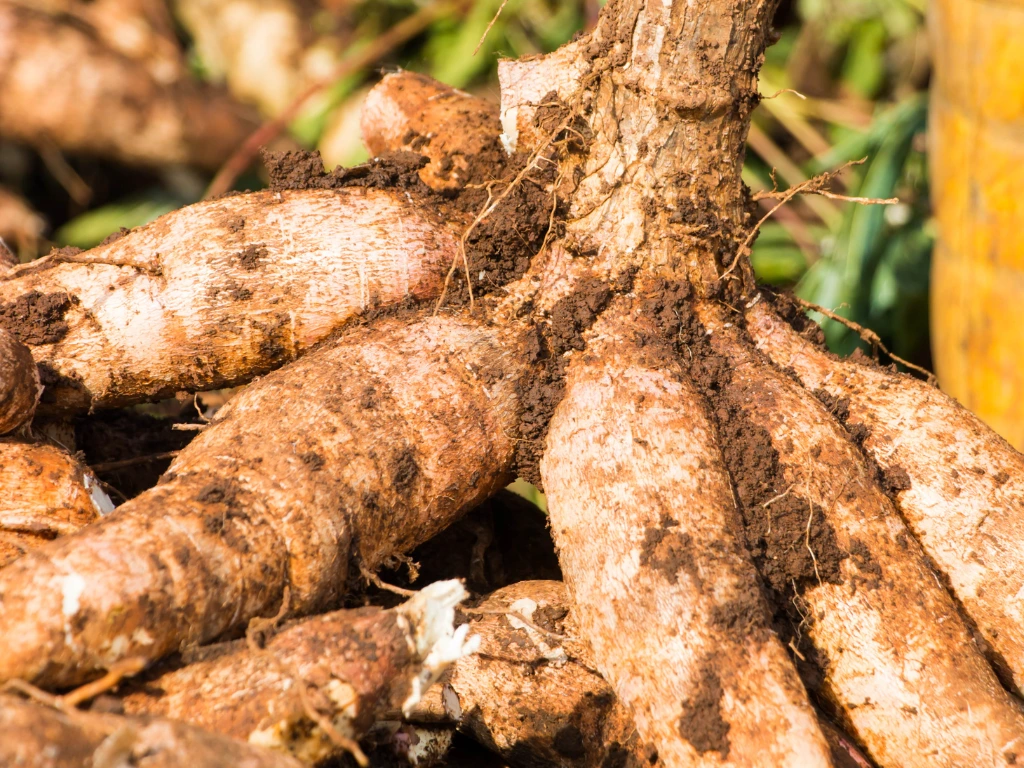
Step 7: Harvesting Time – The Most Rewarding Part
Cassava needs 8 to 12 months to fully mature.
Here’s how you know it’s ready:
-
The leaves yellow and drop
-
The stems become woody
-
You feel thick roots if you carefully dig around the base
Use a garden fork or shovel to loosen the soil around the plant before pulling it out. Be gentle—bruised roots rot faster.
Expect 3–6 roots per plant, each weighing 1–3 pounds. Some gardeners report over 20 lbs per plant with great care!
After harvesting:
-
Use roots within a week (they don’t store like potatoes)
-
Peel and freeze or process into flour if you want to preserve them
Step 8: Saving Cassava Cuttings for Next Year

How to store cassava cuttings:
-
Let them air-dry for 2–3 days
-
Wrap in newspaper or burlap
-
Store in a cool, dry spot (like a garage or basement)
They’ll stay viable for up to 6 months, especially if temperatures don’t dip below 45°F.
You can also plant one or two in 5-gallon pots indoors and keep them going until spring.
Companion Planting with Cassava
Cassava plays well with others! In many cultures, it’s grown with:
-
Peanuts (which fix nitrogen)
-
Pigeon peas (a great permaculture companion)
Just be sure to give each crop enough space.
Frequently Asked Questions
1. Can I really grow cassava in a pot on my patio?
Yes! Just use a deep enough container, full sun, and be patient—it will take time, but you can absolutely grow it on a sunny deck or patio.
2. Is cassava safe to eat raw?
No—raw cassava contains cyanogenic compounds that must be removed by peeling, soaking, and cooking. Don’t skip this step!
3. How long can I leave cassava in the ground?
You can leave roots underground for up to 18 months in warm climates, but texture and flavor decline after 12.
4. What’s the difference between cassava and yucca?
Great question! Cassava (yuca) is a starchy root. Yucca (with two “c”s) is a totally different desert plant. They’re not related—even though the names are confusing!
5. Can I grow cassava in cold US regions like the Northeast or Midwest?
While cassava thrives in tropical climates, gardeners in colder US regions can grow it as an annual or in containers that are moved indoors during winter. In USDA zones below 8, start cuttings indoors, plant after all frost danger has passed, and either harvest before frost or grow in large containers that can be brought inside.
6. How do I know if my cassava cuttings are still viable after storage?
Viable cassava cuttings will appear firm, not shriveled, with intact bark and buds. When slightly scratched, the inner tissue should be moist and light-colored. Before planting stored cuttings, you can test viability by placing one end in water for a few days – viable cuttings will begin to develop small roots or buds.
7. What’s the difference between cassava, yuca, and tapioca?
These terms are related but refer to different forms of the same plant. Cassava (Manihot esculenta) is the plant itself. Yuca (with one ‘c’) is the common name for the starchy root/tuber in many Spanish-speaking regions. Tapioca is a extracted starch product made from processed cassava roots, commonly sold as pearls, flakes, or flour.
Final Thoughts
Growing cassava from cuttings is more than just a gardening project—it’s a way to reconnect with the soil, build food resilience, and try something unique in your backyard.
You don’t need fancy tools or a tropical climate. Just a bit of sun, the right cuttings, and a little patience.
Give it a shot this season—and when you’re standing over a pile of freshly harvested cassava roots, you’ll know it was worth it.
Want more guides like this? Check out Common Mistakes to Avoid When Growing Okinawan Purple Sweet Potatoes or Planting Wildflower Seeds in Spring for a Vibrant Garden This Summer.
Let me know if you’d like a downloadable PDF version or internal links to more gardening posts!